Getting rows together

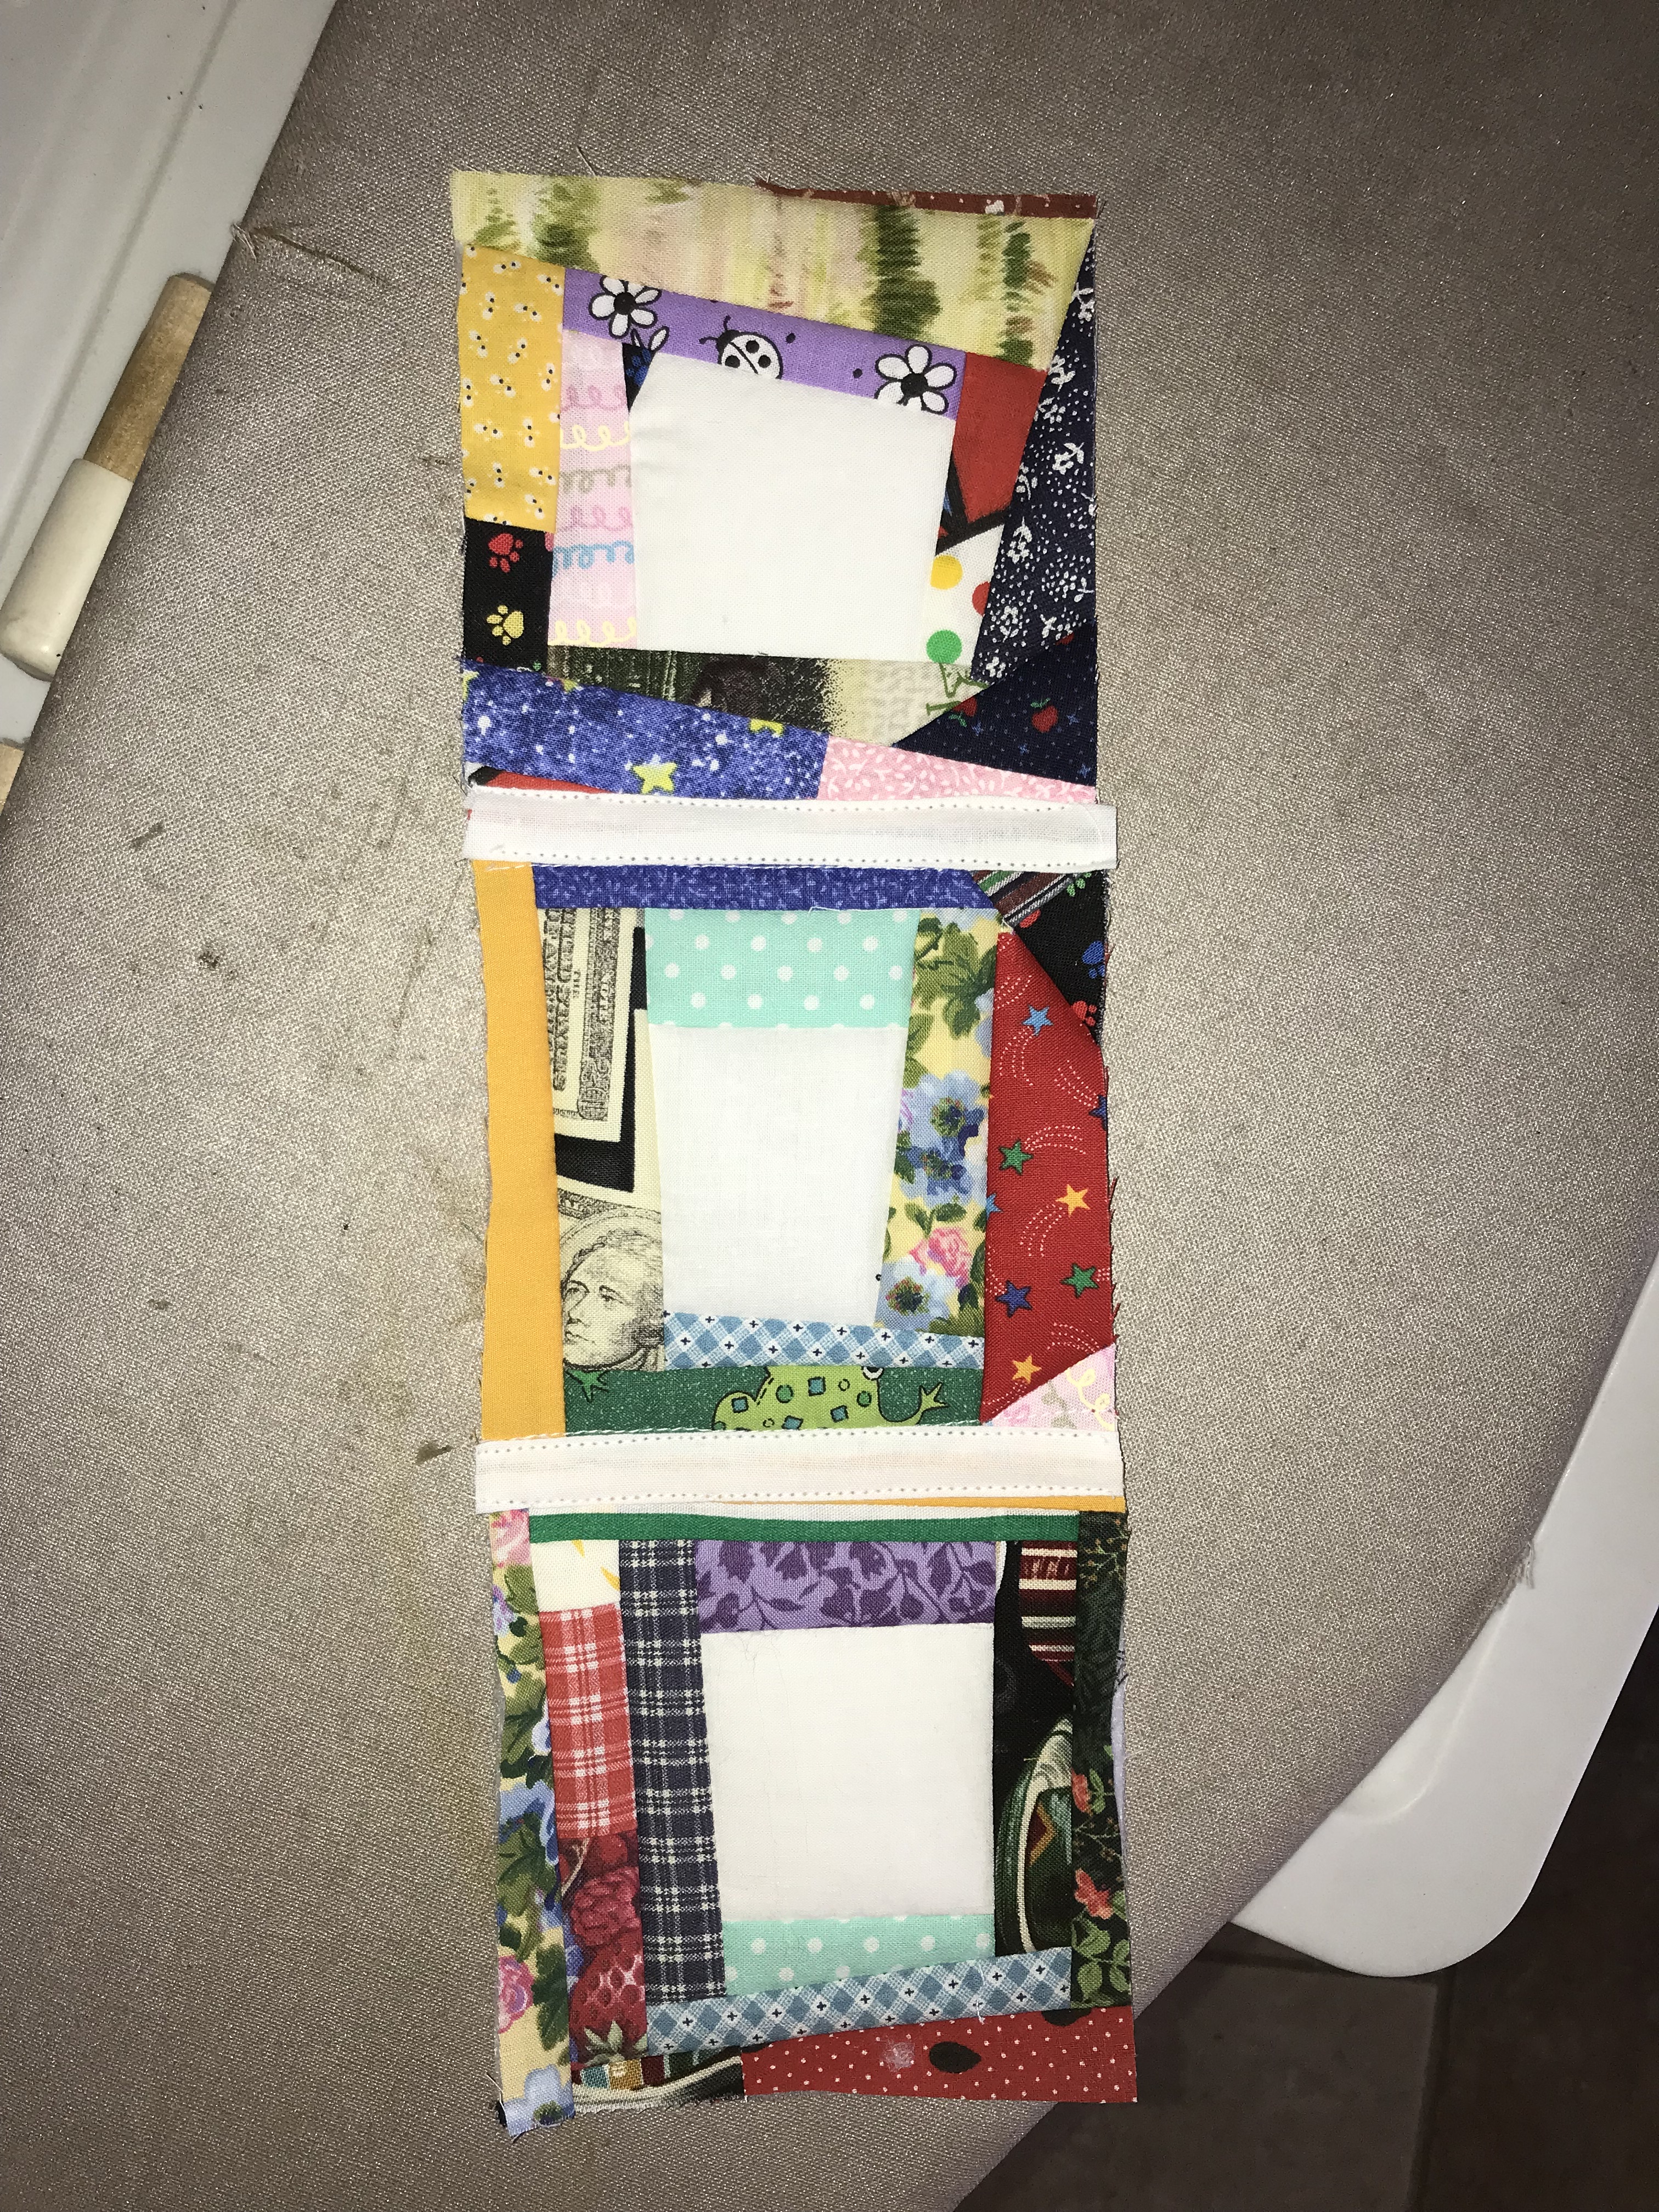
This is more exciting than just sewing 80 blocks and trimming them to size. I had 3 rows sewn together and couldn’t wait to start connecting the rows.

Some progress on connecting rows

I’ll try to explain the process. I didn’t make this up; I found instructions on several blogs. This is not the only way to connect the QAYG blocks, but it’s the way I chose.

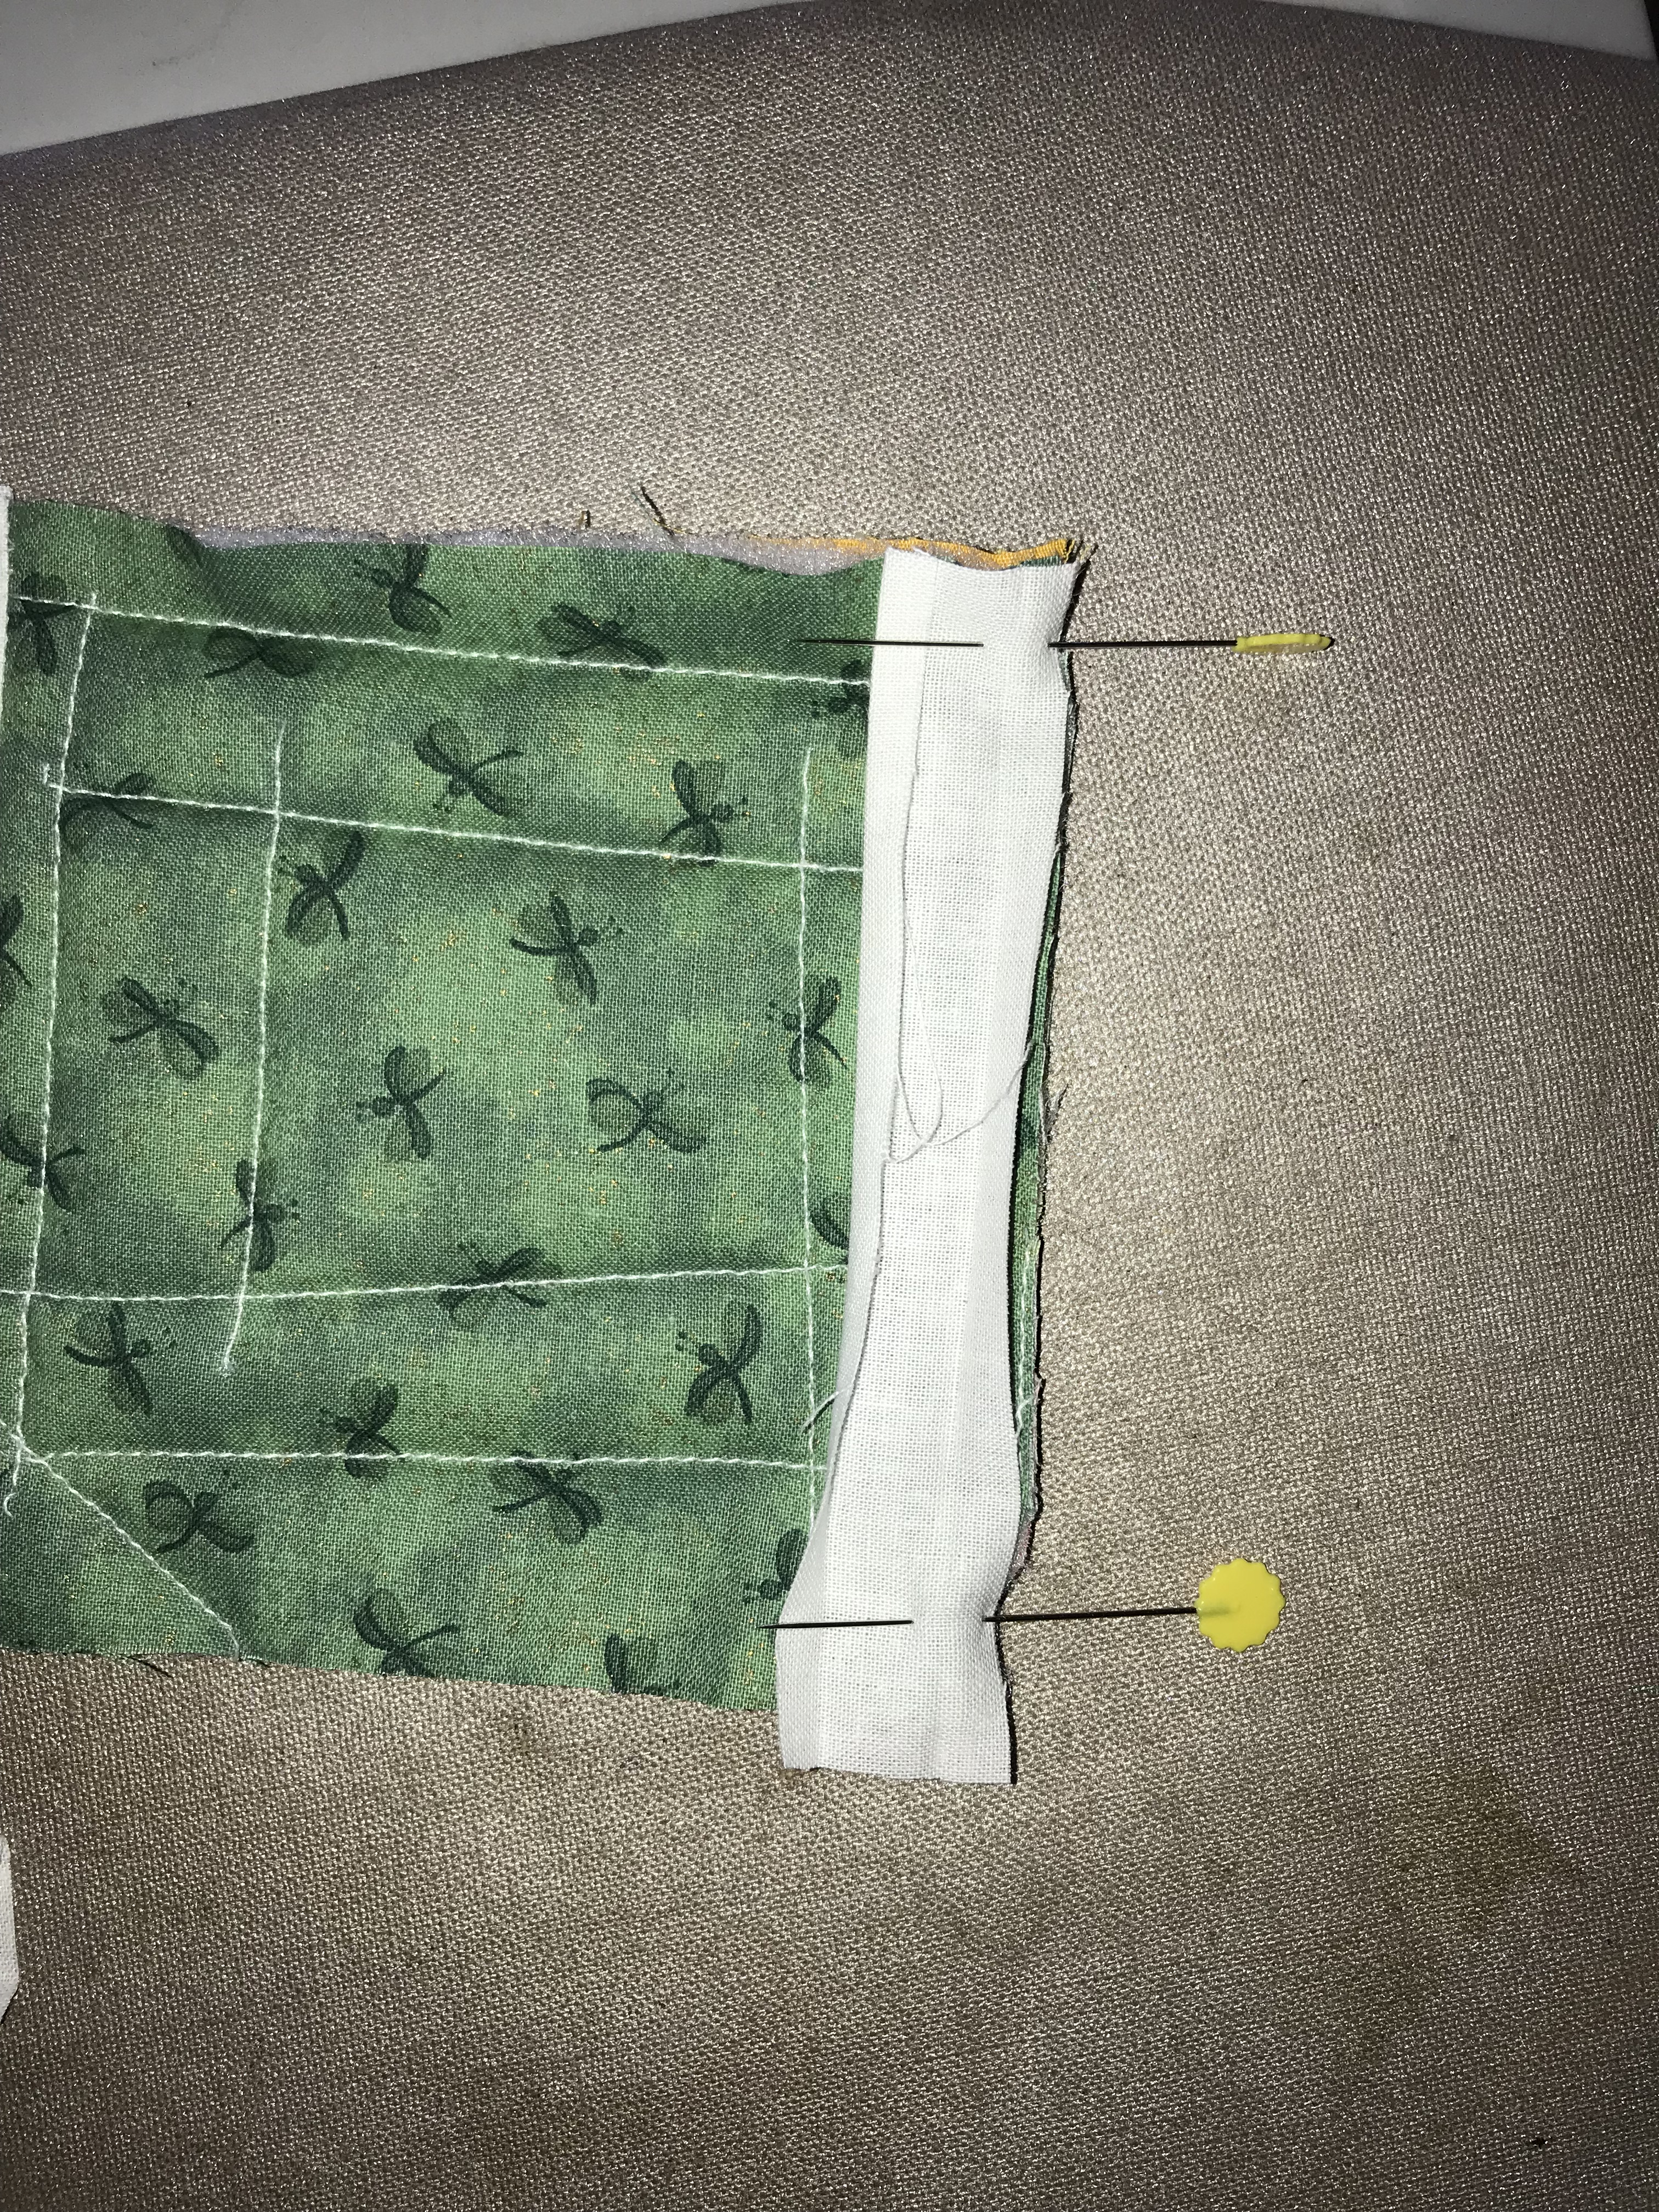
First, I sewed the binding strip to the one side of one block, right sides together.

pinned binding

I stitched along the fold line. Next, I flipped the next block so it was right sides together with the first block. I flipped the stack together and slid the block and the binding so that I could stitch along the fold line.

pinned binding

In the photo above, you can see that I folded the binding along the line of stitching just completed, and unfolded the second part to pin it to the block. At this point, make sure that the blocks are flush at the top and bottom, or your row may be wobbly.

The result is a flat binding strip on the top, and raw edges on the back that should be butted against each other.

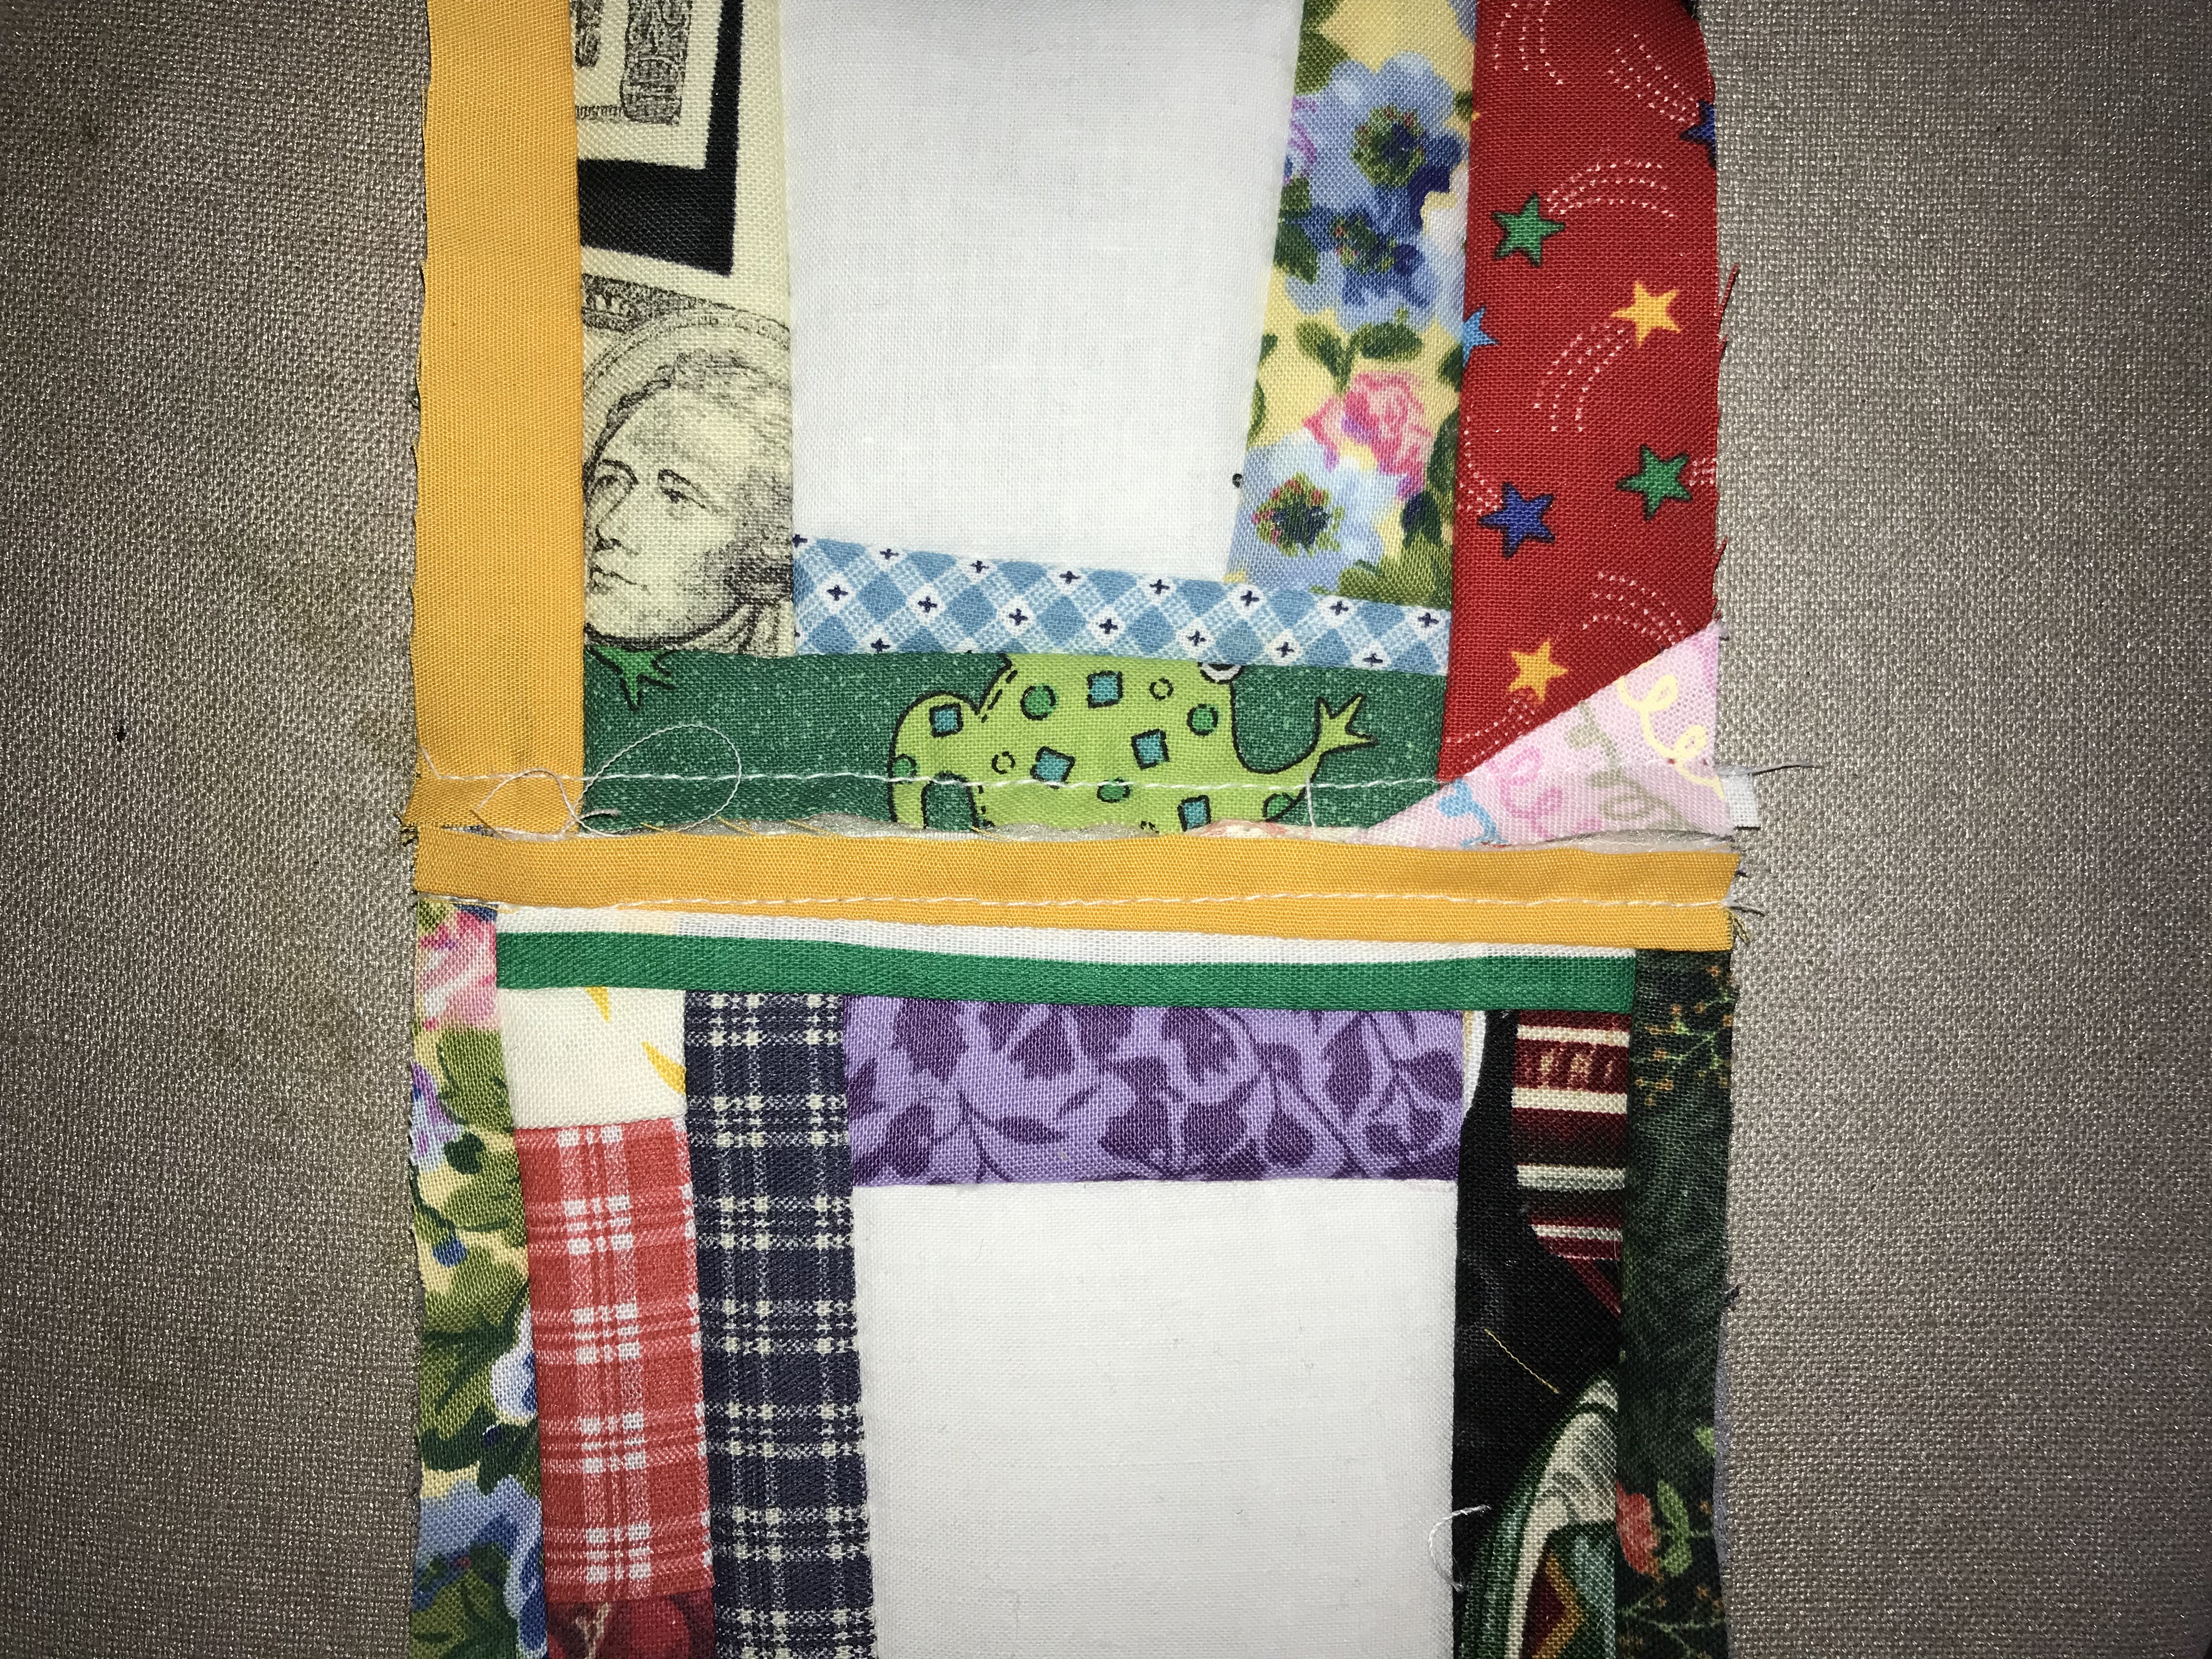
The next part is the simplest. Lay the binding to cover the raw edges of the back. You will find that the binding goes from the stitching line on the left block, to the stitching line on the right. Pin, topstitch on each side of the binding. From both front and back you will see a couple of clean rows of topstitching.

I am loving how it is coming together. The added feature of the colored block backs alternating with the white backs adds interest, and makes a calmer design. I’ve been informed there are only 2 1/2 weeks until the baby’s due date. I replied that I think the quilt will come a little late.

First row and then some

On the quilt-as-you-go baby quilt I have completed the first row. Actually, it was completed more than a month ago, I just have found no time to write for the blog. I was trying to take a trip to Michigan to visit family in early June, but life happens and the trip had to be put off. One great thing about preparing for the trip is that I could use my mother’s sewing machine for this project. It is just about the most portable baby quilt project I have done. I started cutting the pieces I would need for it.

The dimensions would be 8 blocks wide by 10 blocks long. It doesn’t seem like a lot, but then I started cutting. I would need 80 back pieces, 5×5 inches. Forty in color, and forty in white. Then I cut 80 pieces of white for the center of each block. Now I would need 80 blocks of batting cut from the pieces in my stash. I’m still not even halfway done with cutting the batting pieces. I also need to cut binding tape in white for connecting the blocks and rows, unless I only plan to make more blocks while away from home.

I gathered many scraps to use for the blocks into a tub. I love tubs with lids, where I can accumulate pieces for a project, or scraps for future projects. I don’t need a mat and rotary cutter for piecing this one, just sew on scraps and trim with scissors. I can square up the blocks when I’m back home.

I had a tentative week that I would be gone for the visit. My animals would be taken care of, gardens doing well, lawn was mowed. Then I had to put off the visit due to family stuff happening here in Missouri. Then another tentative week was planned for later in June, but had to be put off again. I think I will be able to visit for a week later this month.

first row front
back side

So, the first row looks like this. Not much, so far. The curve isn’t permanent, it will be straight once I sew rows together.

joining blocks front view
joining blocks back view

These pictures show the joining of the blocks, both front and back. In a future post I will show pictures along the way as I join more blocks together. The steps will be the same for joining one row to the next.

Now the surprise – it’s no longer for a potential grandchild, but a real one. There is a bundle of joy coming in October. I’ve known this for a while, but not until after I had started this quilt. I’ll need to get busy on this to allow plenty of time for shipping. My unwritten goal is by the end of September, but the earlier the better. I’m glad this is a quick quilt to make. Once it is shipped off, I’ll start the next.

Quilting in small bits

I am loving one aspect of this project – that I can make a little progress in short bursts of time.

Earlier this month I worked a bit on the quilt blocks. I cut blocks for backing, and also the white centers of the blocks. I’ve decided to lay out the backings alternating a color print with the white backed blocks, in a sort of checkerboard design.

I put a few of the completed blocks together using the binding. Single fold binding gives finished edges where I sew it down. Here are some progress photos.

I’ll do a row at a time until I get the width I like, then begin the second row.

A small beginning

I’m calling this a stringy baby quilt. I chose the “Trash to Treasure” quilt block from my last post. I’m making it on a smaller scale of course. I decided not to cut the block into quarters and sew them back together, because I’m sewing it with backing and batting together to make a prequilted block.

I began with a square of white fabric, 2 1/2 by 2 1/2 inches. I cut a piece of batting and a piece of fabric for backing at 5 by 5 inches. I centered the small square over the batting and backing, and pinned. By the way, this is the reason I have a tub labeled Batting Scraps.

Then I gathered the little bits of fabric I had kept. I set aside anything that was an orphan block from another quilt, I’ll make those into mug rugs, lap quilts, or purses. I found quite a few small blocks sewn into a strip for the maze quilt, I set those aside as well. I started sewing to all four sides of the small square. I didn’t follow the edge exactly, trying to make it a little wonky so nobody would expect perfection. I certainly don’t!

First two blocks done.

Then I realized I backed both of them with white fabric. Not normally an issue, but for this quilt I plan to select backing fabrics of many colors. I made a third block with a pretty green dragonfly fabric for the backing. I trimmed them to 4 1/2 inch squares.

My plan is to make single fold bias tape from white fabric and use it to sew the blocks and rows together. Thus, quilt-as-you-go. I borrowed the method from another blog and I’ll write about the steps in a future post.

In trimming the blocks, I realized that the final strip of fabric can be quite wide, because I’m trimming about 1/4 inch from each side, and another 1/4 inch will be covered by the bias tape sashing. For future blocks I’ll keep that in mind.

Until next time, be safe and be well.

Trying to get ahead

I decided to make some baby quilts ahead of having a need for them. I’m a worrier, and I’m concerned that I won’t be able to make them at the time they’ll be needed.

I have to take a certain biologic drug for my cancer for the rest of my life. One major side effect happened when my feet began to go numb. My feet are now numb and I have partial numbness up to my knees, fading like ombre.

Recently my fingers began to tingle. Now they are beginning to go numb just at the tips. It is to the point that I don’t rely on the sense of touch only, I supplement with sight. My fingers almost can’t tell me the difference between flannel and cotton.

With this in mind, I decided to make some baby quilts ahead. My son and his wife plan one or two more babies, to be born well into the future. My youngest stepdaughter is getting married in the fall and there may be babies in that house in the future. I don’t want to be frustrated to the point that sewing isn’t fun, with several baby quilts on my mind, so I’ll begin making them now and set them aside.

I have done a string quilt (see it here) and I’ve done a brick quilt (here). The plus sign quilt and the maze quilt used up some fabric scraps. Lea’s chevron with small blocks was fun and also scrappy. I’d love to do at least a couple more scrappy quilts to see if I can use up some of my scraps. Being sentimental, I’ll reminisce as I sew, about what dress/toy/quilt I made that the fabric was leftover from. You may or may not have noticed that I almost never do a second quilt of the same design. I’d say never, but then I would immediately find the exception.

I liked the “quilt as you go” design of the string quilt and I looked for online photos or drawings that would work for that. I’m considering several ideas and if you’d like to make a suggestion, please comment! These have caught my eye:

If you could be my decision-maker, what would you choose?

Credits:

#1 Instagram post “Everyday hearts” by Mary Engelbreit @homecompanion

#2 I’ve heard it called “wonky stars”, this from https://thelittleredhen.typepad.com/my_weblog/2008/04/doll-quilt-fini.html

#3 Trash to treasure at https://www.kellifanninquilts.com/2015/11/tutorial-trash-to-treasure-block.html?spref=pi&m=1

#4 Fading Charms at https://weddingdressblue.wordpress.com/2012/03/23/tutorial-fading-charms-quilt/

#5 Attic stairs from https://selvageblog.blogspot.com/2012/02/attic-stairs-scrap-buster.html

Progress on t-shirt quilt

I found more time to work on the quilt. I had listed the dimensions I wanted for each patch and started cutting the stabilizer. I added 1/2 in to each dimension so that I had a 1/4 inch seam allowance on all sides. As I had each one cut, I noted the dimensions on a slip of paper and pinned it to the pieces. I had the width noted first so I would know how to orient the stabilizer before fusing.

I came to the shirt that said American Classic, and decided I didn’t want it included. Same for Salmon Unlimited. We worked for a salmon lure manufacturer, but had only a distant connection to that tournament. I had two other shirts I was happy to include, and the dimensions worked great. I did goof up a little on the DW symbols. The 3×4 worked better as a 4×3 so it will be in the quilt turned to the side, which will just look artistic I think. All the fusing is complete.

Now I have to decide on and buy the sashing and the fleece backing.