My first t-shirt quilt

I know the concept isn’t new, but I haven’t tried it yet. I’ve been preparing for this for a lot of years – I remember asking my son’s mother-in-law on his wedding day, while we were at the hair salon, what type of stabilizer I would need to buy. My son has been married 5 years now.

I weeded out some shirts from my husband’s side of the closet and bought him a slew of new ones. He enjoyed helping me to decide which can go into the quilt. This will be his lap quilt and I knew I wanted it to end up larger than the one I made him a long time ago.

I’m obsessive about planning, you should know this up front. I used a square quilting ruler to see how large each design needs to be cut.

I made a list, then decided I’ll do quilt-as-you-go, row by row. Seeing a lot of numbers on paper could give anyone a headache, so I converted them to colored boxes on my spreadsheet program.

I had to increase the sizes of several in order for there not to be a lot of lattice in places, which I tried to keep to 2 inches. I made the spreadsheet blocks represent 1 inch x1 inch. I fiddled and played with it, moving things in and out, up and down, until I found a design that was pleasing to me. The rows are: 1 American Classic and everything to the right; 2 Antique Archaeology; 3 Kraft Lockout with Jamesport Bk; 4 Team Grandpa.

Side note, he retired from Kraft Foods, and he would typically give me any t-shirts that were given at work. I dug out 3 of my own in order for Kraft to be well-represented. Both of us worked for a salmon lure manufacturer in Michigan, Dreamweaver, and I used 2 shirts for their designs as well.

I have a lightweight (almost weightless!) stabilizer ready to go when I have the shirt designs cut out.

Now the references, so the appropriate group or business shirt comes up in a search. #dreamweaverlures @ssbadgerferry @americanpickers @KraftHeinzCo @tigers

Special-ordered sweatshirt

My mother-in-law had two special sweatshirts ordered – Grandma’s pumpkin patch had the names of all her grandchildren. Granny’s pumpkin patch had the names of all her great-grandchildren.

After her death in 2019, my husband’s sisters wanted to know if I could think of anything to do with the sweatshirts. I’ve made pillow covers before out of t-shirts, but I wanted to do something different for these.

I decided to stitch around each name-with-pumpkin to make a small quilted ornament. I keep batting scraps in a tub in case they are useful for small projects, and it was certainly was.

I placed a scrap over the sweatshirt to gauge whether it would cover a row or two of names. Then I place it inside the sweatshirt and pinned it in place. I stitched around each name, making sure I had room to cut out each one between stitching two that are close together. The way the names were arranged, having a uniform shape would not work.

I am still working on the stitching, in between my other chores, and I haven’t yet decided what else to do with them. I was thinking of giving each sister a garland of her children’s and grandchildren’s names, joined by a green ribbon. At some point when these are complete, I may edit the post to add photos of the finished project.

Just the essentials

Ready to go to the auction!

As I said, I wanted a small crossbody purse to wear to auctions. I didn’t want everything I usually carry in my purse, because it would be too heavy. Thus, the name, Essential. This worked up so well that I may sew some companion zip pouches and crossbody purses to sell.

I was glancing through my stash and this yellow/blue plaid men’s shirt caught my eye. I had thought to remake it into a blouse for me, but I couldn’t resist using it to make this purse.

A messy workspace is a sign of a creative mind…..right?

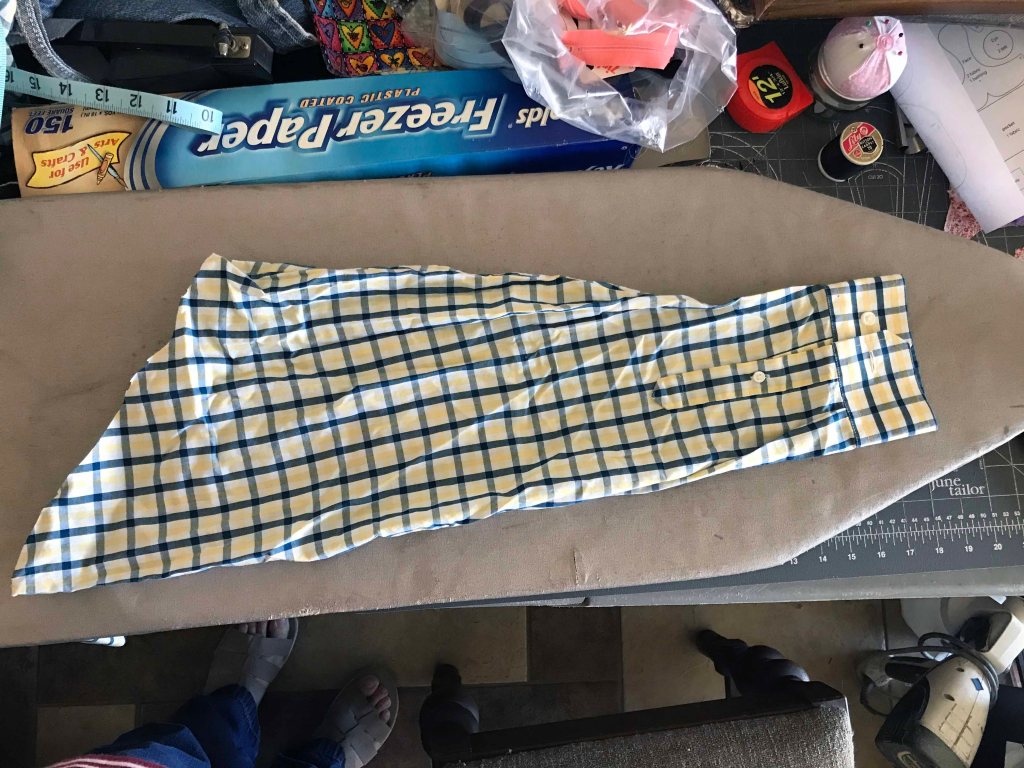
First I cut off the sleeves. I wanted to use the cuffs as the top edge of the purse. I love the shape, and it has the stabilizer inside. I cut the cuff with a little of the sleeve fabric still attached, for the seam allowance.

I didn’t want my purse as wide as the cuff originally, so I made a seam in the middle. I pressed the seam open and topstitched.

Before and after

I decided on the dimensions for my purse, and cut 2 of the shirt fabric and 2 of a muslin for the lining. I wanted it thinner than what it would be using cotton batting, so I found a scrap of flannel and cut 2 of the flannel. It has a faint floral pattern, but it won’t show through the plaid.

I layered the fabrics and pinned, then stitched some straight line quilting.

I sewed the cuff to the top of each body piece, topstitching to finish. I had trimmed the fabric and serged it for a neater seam.

I often find leftovers of binding. Either in a bag of thread and notions at a thrift store, given to me by others, or part of the treasures in a sewing basket. I pulled out some blue binding, but the color wasn’t right. I had almost the exact amount of white. You can see I need a little more practice making mitered corners.

Now for the strap. I actually have a basket of men’s ties, and I thought it would be perfect to use a blue/yellow tie with the purse. I had one, with a shape on it that looks like New Jersey! After trying it on, I didn’t like it after all, so I dug in another box of potential purse straps. I found a blue trim that is a little stretchy, just the right width, and a beautiful navy blue. I cut small pieces of the shirt fabric and made tabs at the ends so it won’t unravel.

I attached the tabs to the inside of one cuff piece, then topstitched so it was sandwiched between both cuff pieces.

I really love it! I can’t wait for the local auctioneer to have more auctions I can attend. I like to purchase the lonely sewing machines that others don’t bid on, and get them oiled, repaired, and working again. My husband realizes that if I see one, it will probably come home with us.