Applique

This week I worked on some applique. I used HeatnBond, which is fusible on both sides. I found some simple outlines I wanted to use, first were the campfire and tent. I traced the shapes onto the paper side of the HeatnBond and cut around them, then fused them to the back side of the fabric I wanted to use. I used a pin to scratch the paper backing and remove it, then I fused the fabric to the items. In this case it was to make two coasters.

The applique needs stitching, so I chose a blanket stitch, made it small to match the scale of the coasters, and I love the result. I added borders and even repeated the blanket stitch there. I cut the backing oversized to fold to the front and bind it.

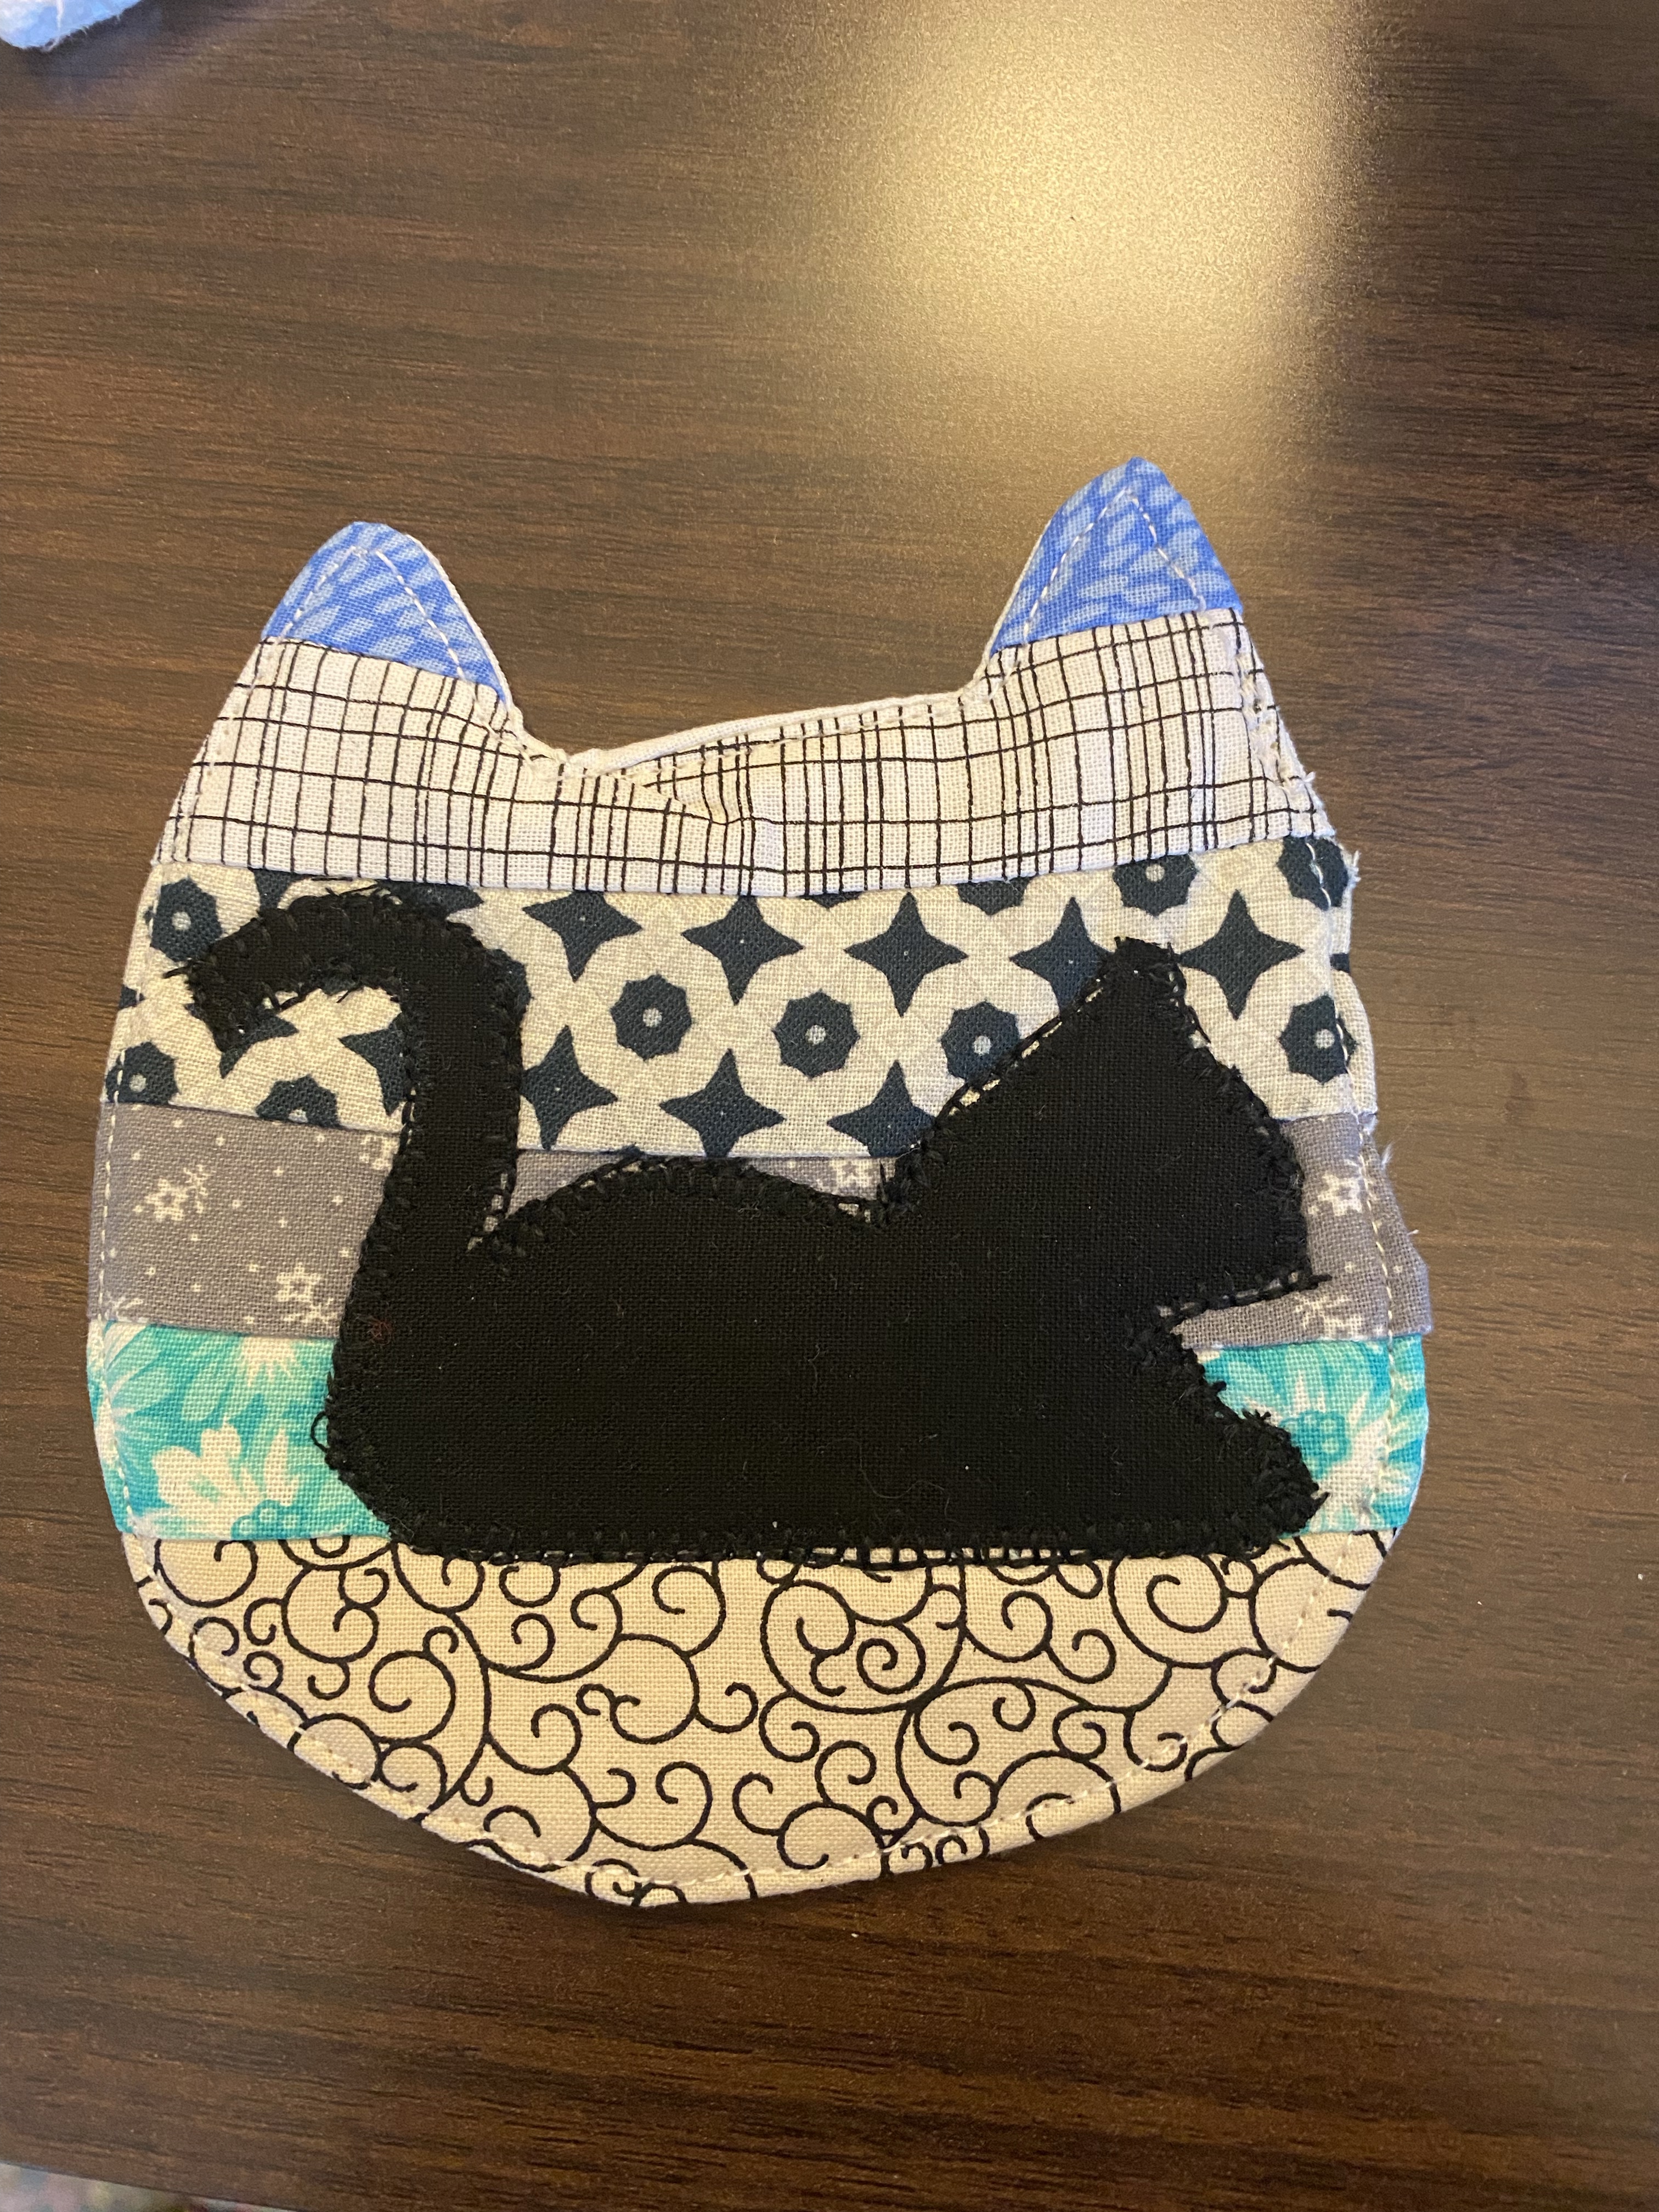
I found a cat silhouette I liked and added a cat applique to one of the cat-shaped coasters. I will continue to use the method on other things, like an initial on a coin pouch, or other shapes.

While looking for shapes I found some I liked, but they would work better as embroidered accents. To do that I’ll have to work on my embroidery machine (fix the tension) and test out a few.

Happy Accidents

I mentioned I had bought a pound of fabric strips. They are the ends of bolts, so they may be a bit uneven and can be anywhere from 3-5 inches wide. I knew I’d be using small pieces for patchwork so it worked for me. I could not picture how much fabric a pound would be. The internet was mostly not helpful, but being stuck far from home and not allowed to shop in person, I took the chance. I was thrilled with the variety and the amount of fabric I got for that bargain price.

There were blenders, wild prints, and some that were novelty prints including medical themed for nurses’ scrubs. I’ve had a lot of fun challenging myself to put fabrics together that will look better than each alone. Like happy accidents.

I’m making two basic shapes of zip pouches, coin size and makeup size. I will sell them at a flea market booth starting this summer at $15 and $20 each. Come look at some of the fabric combos I’ve made.

The fabrics are for scrubs, one with lungs and bones, the other has medication names.

The pink and green fabric has giraffes on it. I thought to disguise that with the pink stripe alternating.

More scrubs fabrics that really coordinate well. The skeletons on the darker blue are in yoga poses, that made me laugh.

I wanted to use the dark fabric and had to find something else with a similar color to the orange swirls.

I have plenty of fabric to keep going with all my zip pouches, hotpads, drink coasters, and anything else I can think of to quilt for my flea market booth. Wish me luck!

Getting rows together

This is more exciting than just sewing 80 blocks and trimming them to size. I had 3 rows sewn together and couldn’t wait to start connecting the rows.

Some progress on connecting rows

I’ll try to explain the process. I didn’t make this up; I found instructions on several blogs. This is not the only way to connect the QAYG blocks, but it’s the way I chose.

First, I sewed the binding strip to the one side of one block, right sides together.

pinned binding

I stitched along the fold line. Next, I flipped the next block so it was right sides together with the first block. I flipped the stack together and slid the block and the binding so that I could stitch along the fold line.

pinned binding

In the photo above, you can see that I folded the binding along the line of stitching just completed, and unfolded the second part to pin it to the block. At this point, make sure that the blocks are flush at the top and bottom, or your row may be wobbly.

The result is a flat binding strip on the top, and raw edges on the back that should be butted against each other.

The next part is the simplest. Lay the binding to cover the raw edges of the back. You will find that the binding goes from the stitching line on the left block, to the stitching line on the right. Pin, topstitch on each side of the binding. From both front and back you will see a couple of clean rows of topstitching.

I am loving how it is coming together. The added feature of the colored block backs alternating with the white backs adds interest, and makes a calmer design. I’ve been informed there are only 2 1/2 weeks until the baby’s due date. I replied that I think the quilt will come a little late.

Portable project

I said this was a great method for putting in just a few minutes here and there. It is also fantastic for being portable.

I live in Missouri but I’m originally from Michigan. I needed to go back for a visit and didn’t want to lose 7 or 8 sewing days, so I brought it along. I managed to fit everything into two smallish boxes, plus the small portable sewing machine.

I could have brought it into the motel room where I stayed overnight on the way there and on the way back. I decided I was too fatigued from the drive to do anything but read and relax.

With rows of 8 blocks and making 10 rows, I will need 80 blocks. Today I counted what I had sewn and trimmed, and it came to 55. I swear, the scraps keep multiplying when my back is turned. There seems to be just as many scraps now as there were before I sewed 55 blocks.

These are some of the favorite blocks I’ve sewn so far. I played with putting the white block in the corner or on point. I used narrow strips on some, wider strips on others.

I’m anxious to put this one all together. I think it will be a colorful feast for the eyes, and I’ll love to welcome the newest grandchild home with this quilt.

A small beginning

I’m calling this a stringy baby quilt. I chose the “Trash to Treasure” quilt block from my last post. I’m making it on a smaller scale of course. I decided not to cut the block into quarters and sew them back together, because I’m sewing it with backing and batting together to make a prequilted block.

I began with a square of white fabric, 2 1/2 by 2 1/2 inches. I cut a piece of batting and a piece of fabric for backing at 5 by 5 inches. I centered the small square over the batting and backing, and pinned. By the way, this is the reason I have a tub labeled Batting Scraps.

Then I gathered the little bits of fabric I had kept. I set aside anything that was an orphan block from another quilt, I’ll make those into mug rugs, lap quilts, or purses. I found quite a few small blocks sewn into a strip for the maze quilt, I set those aside as well. I started sewing to all four sides of the small square. I didn’t follow the edge exactly, trying to make it a little wonky so nobody would expect perfection. I certainly don’t!

First two blocks done.

Then I realized I backed both of them with white fabric. Not normally an issue, but for this quilt I plan to select backing fabrics of many colors. I made a third block with a pretty green dragonfly fabric for the backing. I trimmed them to 4 1/2 inch squares.

My plan is to make single fold bias tape from white fabric and use it to sew the blocks and rows together. Thus, quilt-as-you-go. I borrowed the method from another blog and I’ll write about the steps in a future post.

In trimming the blocks, I realized that the final strip of fabric can be quite wide, because I’m trimming about 1/4 inch from each side, and another 1/4 inch will be covered by the bias tape sashing. For future blocks I’ll keep that in mind.

Until next time, be safe and be well.

Simple potholders or hotpads

I belong to a quilting group on Facebook and this project for pot holders was posted. Here is my own photo tutorial on the simple potholders.

DSCN0050

template for batting

Using dish covers, I traced circles on the cotton batting. I made both sizes, blue and orange. 😉 You can use cotton batting or batting that is made specifically for potholders.

DSCN0039
Widows and orphans and crazy patch

These are some of the potholders I whipped up quickly.


DSCN0040
scrap pile

I gathered my materials – scraps from other projects and box of bias tape bindings. I plan to use up much of what you see.

DSCN0041

On to the tutorial. To start, I placed a leftover block on the cotton batting. I did not use a separate foundation (muslin); I simply sewed right onto the batting.DSCN0042

I topstitched the seam lines, because I like the quilted look.DSCN0043

I placed coordinating fabric along the edges so that fabric covers the batting completely.DSCN0044

DSCN0045 DSCN0046

Trim around the batting.

Then I found another green print and cut 3 circles. Place one circle on the back of the batting with the right side up. The other two circles should be folded in half with right sides facing. Place them on the back of the potholder so the fold lines are together.DSCN0047 DSCN0048

I sewed a narrow zigzag all around the edge to keep the layers together.DSCN0049

Add a binding and you are done. If you are making a circle, you must use bias binding. DSCN0050

The folded circles added to the back allow you to use the potholder as a pan or lid grabber.DSCN0051


For Lea

Our 7th grandchild was born early, and I was caught unprepared. I finally have the quilt done for baby Lea. I started it soon after I finished Callan’s in June, and I even had a shortcut. I already had a lot of small patches cut, and several were joined in various formations that I could use in this one. I had found a photo on the internet, which is how many of my ideas happen, and knew I wanted to try my own version of it. It didn’t matter what sizes the original poster had made hers, I was using what I already had. I can’t find the person’s blog where I found the design, so I can’t give credit. If you recognize this, please comment and let me refer to your post.

A couple of things slowed me down – I have arthritis in my hands and it is getting worse. The patchwork didn’t bother me, but even machine quilting isn’t comfortable for very long. I even gave up finishing the binding by hand, using the machine only. I also fell and sprained a wrist and the opposite hand’s thumb, so it really hurt to quilt by machine!

So, enjoy the photos, and the baby will soon be enjoying the quilt.
lea quilt1

lea quilt2

lea quilt3

Quilt finished in time

I love it when I can deliver a baby quilt before the baby is delivered. Grandson Callan is still expected, as I write this, and the quilt is in the hands of the parents, completed a couple of weeks ago.

Image

Image

I did the binding differently this time. I machine-stitched it to the front and folded it to the back, but what is different is that I machine-stitched it to the back as well. I made sure the stitches would catch the binding, and used a blind hem stitch (3 straight stitches then a zig zag). The arthritis in my hands just won’t allow the tug of hand-stitching binding any more. I did hand-stitch the label into place, which I created on my 12-year-old Brother embroidery machine.

I have already begun the quilt for the September grandbaby.


June baby

Our daughter-in-law announced just after Christmas that she is expecting another baby boy. Two years ago I finished this star quilt and presented it for their baby boy born that year.

Image

After recovering from my stem cell transplant in January, I knew I had a short time to make the new baby a quilt of his own. I like the shortcuts the Eleanor Burns comes up with, and remembered seeing a televised episode of her quilting show that featured the “Twin Sisters” quilt block. (You can watch it online here) Anything Eleanor says can be done quickly would work for me. After I completed the wall hanging for my niece I had less than 2 months left.

I intended to shop for fat quarters, but decided to dig into my scraps and see what I could find. I estimated about 50 blocks would be needed for a baby quilt. I found I had plenty of fabrics that I could cut up and use. I had already begun working again from home (love telecommuting!) so I only had evenings and weekends again to work on it. Here is a look at one of my first quilt block pairs:

Image

You may have noticed my pinwheels spin backwards. Story of my life! Once I began that way, I had to continue that way. After sewing the strips, cutting blocks, cutting the diagonal, then sewing again, I ended up with 56 blocks, plenty to lay out for a baby quilt with some to spare. I really enjoy the shortcuts, making it slightly over-sized then trimming. Makes the blocks more accurate than I could normally accomplish!

I was able to incorporate some of the star patterned fabrics from big brother’s quilt, and also other fabrics the baby’s father might recognize from other projects.

String quilt finish

I managed to learn a new technique and finish the string quilt I began back in June of 2010! Click the link to see some block layouts I tried.

The blocks stayed in a plastic tub on my shelf, because there was no recipient slated for it, and I didn’t have a deadline. I learned that about myself, I need a deadline. I saw this post on Margaret’s Hope Chest blog, and decided the string quilt can be finished and used for this purpose. Check it out, and see if you know anyone that can help out this great cause.

String quilt complete

I am not going to write out the tutorial for Quilt-as-you-go sashing, because so many others have done it. What I would do, though, is adjust what I did so that the sashing is a bit narrower. All my great corner fabrics were hidden! I used the same fabric for front and back sashing, and at the end of cutting the strips, I had a piece left that is 2″ by about 20″. Just enough!

As I was trying a layout, I wanted the heart shape, but wanted only 5 blocks wide instead of 6 as I tried a couple of years ago. I made it 4 blocks wide and cut blocks in half as a kind of self border. I’m very pleased with how it looks!

View of the lake on a snowy January day.

Since this is my view today, I think I’ll be sewing some more! Projects recently completed include doll clothes and wool mittens, but today I’m going to concentrate on fleece vests for myself.